|
Total from 2015
238.5 hr
Had bit of distraction last year making 2 sets of bodies for
Brian plus busy with other life's
things. So not too much progress was done to the car. Hoping that this
year will be more productive as most of the chassis is done and majority
of panel mounts are there and ready to be finished and have the body
fully mounted. There are tons of little things still to be engineered
and made plus the door inner shells need to be made now that the windows
regulators are semi decided on and front fenders will need to be remade
altering the hoop above the wheels and rising bit around the headlights.
Hoping that plugs for the front and tail lights get finalized over the
cold days and inner door shells have a good start so that they can be
made in spring early summer time to complete the last part of the major
body panels.
Jan 10, 2016, 1.5hr
Sanded down tail light shells and center console and re-primed. Not very
happy the way bottom of the recessed area looks like and need to make
adjustment on how the outer stand of on left shell was cut out. Filled
that out completely to make better more symmetrical one matching one to
the right side
Jan 12, 2016 1hr
Refilled some of the smaller holes in tail light buckets. top filled
center console. Started building up right door inner shell.
Jan 14, 2016 2hr
Sanded down center console and re-primed. Decided to fully cut down on
the rear light buckets rather then slowly working around the stand off's
on bottom of the shells. Its a bit more drastic approach but it makes
sense as it will work out to be probably less time consuming as the
stand offs are all there now to their final dimensions and there is a
flat (semi flat) recessed surface for the water drain. It still needs to
have all the holes filled.
Jan 24, 2016 0.5.hr
Filled in tail lights imperfections, center console and filled in more
of the right door shell
Jan 25, 2016 1hr
Sanded down all the extra stuff and primed from day before. its
not perfect but phase 2 of cut backs on the tail lights is almost done
other then some minor pin holes. Next will be the final back cut on the
housings and once completed they will be ready for molding
Jan
30, 2016 1hr
During the gluing process of the foam for right
door inner shell the second layer got slight shifted resulting in a gap
between the foam and tube that it was originally supposed to be resting
on. To correct the problem glued on extra foam to fill in the gap. Will
need to trim it down once it cures. Also glued 2 pieces of foam to
start making plug for left door shell.
Made first cut-back on the
tail light housings and primed to prevent any moisture getting into the
main part when filling in the rough cuts on the plug. Still need
to make additional cut back to provide entrance of wire cables into the
housing and prevent chafing of wires.
Jan 31, 2016 2hr
Working on the plugs bit more today. Started again on front head light
plugs, Found center of the 2 projectors, added extra bump to the main
beams on the back side of the rear dust covers as the access doors will
not have enough room to clear the igniters. Smaller projectors will need
to be recessed a bit to make extra clearance for the wheels and wheel
well liner. This will be done after building up back side of the
housing.
Skimmed the rear light housing and hopefully it will not require too
much work to it as its getting very close to their final shape and they
can be put away till worm days when molds could be pulled from them.
Skimmed center console and hopefully this will be the end to the top
surface and hopefully can move onto the sides soon. Trimmed off the
extra glued on foam on right door shell.
Feb 2, 2016 1.5hr
Sanded everything down from the previous day and gave it a coat of
primer. Need to do bit more filling on the tail light buckets. Front
back cover as it was just a glue in process needs more filling. Center
part of the tonou top part is finally smooth just need to work on the
sides and figure out how to join it with the dash
Feb 6, 2016 1.5hr
Started 4th cut back on the tail lights. Recessed back covers for front
headlights. extended right side of door shell plug.
Feb 8, 2016 0.5hr
sanded down from previous day and primed the plugs.
Feb 14, 2016 1hr
Decided to head into garage tonight, carved out last relieve for cable
routing on the tail light buckets and small notches on bottom and back
for water to go around plus making easier for adjustments. The cut outs
still need work but this will make last mods to the plugs till making
molds.
Feb 16, 2016 0.5hr
Filled in all the cavities in the rear projector housing. Used remaining
part of the filler to build up right door shell
Feb 18, 2016 1.5hr
Sanded down front back covers for headlights sanded down tail lights and
primed. the plugs are virtually ready. There are couple nicks on corners
but will leave it to fix it just before molding as most likely they will
get damaged more. Tail housings need last final filling and sanding
after in the last cut back area for the wire entrance to the housing.
Will have to concentrate on front main headlight shells and will have to
finalize rocker and quarter panel mounts so that inner door shells can
be finished for molding. Will have to also weld up door hinges as
they will be vital part in the door shell's forming
Mar 13, 2016 1hr
Build up some of the void that was removed on front bumper in prep for
front headlight buckets adding bit more at the back to provide a
mounting point for the headlights. Will have to wait till it cures and
see how it will fit with the back dust cover.
Mar 14, 2016 1hr
Build up bit more of the bumper section for the headlights
Mar 27, 2016 2hr
Build up and filled more of the headlight area on bumper. Did a rough
bucket alignment of the buckets. left side is about 1/4" miss aligned
when referencing mounting surface of the projectors. Which in turns
making the projector mounting surface about 1/8". 2 options to correct
it is to correct surface of the left bucket making it extremely lengthy
process. option 2 is to build up the mounting surface which should be
fairly quick.
Sanded down primer runs on tail light buckets
Mar 30, 2016 0.5hr
Started to contour right side of bumper to match headlight plug
properly. Need to make up pivoting bumps for the plug so that it can
move easier and create spacing between bumper and main shell.
Mar31, 2016 1.5hr
Looked at the bumper / headlight alignment. Looks like there are couple
issues with the bumper and initial analysis of the issue. Seems like the
bumper has slight symmetry issue on the curve around headlight just
around the corner cut line of the trunk. Right side is bit indented or
the left side has slight bump out to it forward which will explain why
the head light bucket is off. Secondly the left side bucket was slightly
sunk in as well so I did quick build up of that area to compensate and
be more in par of what right side is.
As to the entire bucket lens contour, as it has slightly different angle
decided to fill in the center part of it on the right side to see how it
will work out. Plus this modification will not only make the contour
flow better but it will also compensate for the extra bump on left side.
In all it should even things up.
Made up pivoting points for the bucket as well into half sphere
templates. Apr 3, 2016, 2 hr
Cleaned up from previous day. laid up some more filler to compensate
for symmetry differences on the front bumper. After laying the filler Had
realized that the light buckets need to be sunk down further as to make
up clearance for thickness of the fender fiber glass.
Well I guess things need to dry up and start digging into the filler and
looks like will have to cut some more of the old bumper under the light
buckets. Good thing that it will be replaced with proper form at the end
Apr 10, 2016 4hr
Aligned rear quarters and bolted together to rocker panels. Made up
spacer for center tonou and resurfaced making a better angle on the
sides. re-adjusted headlights and refilled extra gaps. It will be more
work to the buckets but decided to make the headlights flash with body
Apr 12, 2016 2hr
Dug into the filler of for headlights on the bumper. Had to drop it down
bit more Hope this is the last time. Filled in gaps. Filled in left side
of tonou. When it dries it will be sanding time to see how close are the
tolerances. Will have to do something about the headlight buckets as
well as the line where bumper meats up with the bucket looks off and it
would require tiny sliver on the fender to cover it up. Apr 16, 2016,
3hr
Keep on making same mistake over and over with the headlights between
making sure there is enough clearance for fender and proportion left to
right. Wasted good amount of time today again on this stuff. Will just
have to make sure that they match from left to right and deal with the
clearance after the fact. In any case, carved out the fenders again.....
and refilled to match I hope. Left will be where it. will just have to
deal with the right one. Decided to trim down of the light buckets to
compensate for the triangular filler that would had been required. Will
have to fill in the bumper next time as for today was to make up for the
difference. Sanded down tonou and filled in some small areas. With this
build up it will have eight of inch gap between the cover and
frame to fill in with cushion to absorb vibrations from fiberglass on
metal.
Apr 17, 2016 0.5hr
Quick clean up and fill up of the inner gaps and build up of right side
of the front bumper and to fill up of center tonou.
Apr 18, 2016 1.5hr
Finally, front bumper is all symmetrical, just filled in some
voids and bit more sanding to get it smooth and where it supposed to the
front part will be done. Will move on to mounting points and back part
of the bumper. Unfortunately the headlight buckets weed to be
reworked a bit as the roll off around the inner part is not same between
left and right sided. Worked on symmetry of the center tonou
as well and center console part of the dash. Looks like it was
symmetry day today
Apr 24, 2016 1.5hr
Cleaned up all the extra filler around the bumper, Finally it looks like
it will work out perfectly. Next step is to make up the mounting points
for the light case and adjustment in the back of the bucket following
cleaning up of the back end of the bumper.
As the buckets have different contour then originally the fenders where
made. Had the right bucket cut on the inside edge around the trunk. Will
have to fix the bucket and dust cover.
Sanded down a bit of center console, Will most likely have to make it
bit bigger overlap as to crate larger gap
Apr 30, 2016 1.5hr
Ground down left headlight to match contour to right one. Build up lip
on both headlight buckets.
widened left side of tonou and filled in center cluster
May 1, 2016 2hr
After some adjustments build up right side of the tonou, Headlights new
contour looks so much better after cutting back some of the extra
filler.
Tried the TIG again. with new electrodes. The lathinated electrode
works soo much better with aluminum but will have to get smaller cup
size and rods those 1/8 rods seems too big for this job
May 5 2hr
trimmed both left and right light buckets to fit into dust back covers.
Trimmed down back covers to follow lower contour of the buckets. Made
template for tonou cover. Trimmed dash center panel. Surface filled
light buckets, the center dash radio section and filled in tonou on
right side to match contour of the left side
May 10 2hr
Adjusted profile on headlight main buckets mating with dust cover and
filled in parts headlights that where adjusted for the inner curvature.
Sanded down center radio section of the dash board
May 12 1hr
Filled in small areas on bumper just around center of the head lights.
Sanded down further center part of the dashboard and filled in building
up bap just like main pat of the arm rest / tonou section to clearance
for sound dentening material and flow inline with tonou part
May 17 1.5hr
made some final adjustments to the fitting of main headlight housing and
dust covers. Unfortunately broke fairly large part of one housing and
had to reattach :-( more wasted time, but it looks like its getting
close to the end of the housing adjustments. Will have to focus on
projector alignment and mounting to the bumper / frame.
July 1 1.5 hr
Tried and adjusted radiator fitment on right air intake. cut out some of
the fiberglass panels to accommodate fitment
July 5 1hr
started looking at making supporting plates to fasten rockers to quarter
panels. Will utilize same idea as lower rear diffuser with quarter and
rocker having metal support bonded and sandwiched with fiberglass so
that a bolt can be used to fasten the 2 pieces together
July 9 1hr
Welded up drilled and tapped all brackets for quarter panel fastening.
Had them primed and even though they will be embedded in fiberglass I
like to paint them to prevent any rusting.
July 16 3hr
Pulled both quarters and rockers off. cut out excess fiberglass on the
right quarter to match the rocker so that it would clearance the
radiator. Also cut out excess fiberglass on left rocker to be
proportional to the right. Looks like opening for radiator will be
roughly around 13x14" just enough to clear the cooling fins for the
radiators. Ground off some welds to make it looking nicer.
Started preparing inside of the fiberglass to bond the steel standoffs
and threaded nuts in the fiberglass
Jul 23 3hr
Finished preparing fiberglass for lamination of inserts for quarters and
rockers and fibreglasses quarters part of the mounting spacers into the
quarters
Jul 24 0.5hr
Fibreglasses in rocker side of the spacers. Can put the pieces back on
the frame bolt up the panels and lay up foam for the door frames.
Jul 26 2.5 hr
Split up the quarters and rockers. Cleaned up extra fiberglass from
stand offs. re-tapped and re-drilled and reassembled.
Aug 5 3hr
Bolted on left rocker panel and bolted together quarters to rockers and
to the chassis. Now that they are firmly stuck together. made up left
side of door foam. Will probably need to glue on some extra layer close
to the front to make up some extra thickness. Next fasten them in and
start making forms for the inner door frames
Aug 21, 1hr
made adjustments to the front part of the sills which mount to the
fenders and bolted them in. Trimmed them too short and its a good
thing that the fenders need to be remade as some sections need to be
extended plus packets for the hinges need to be made
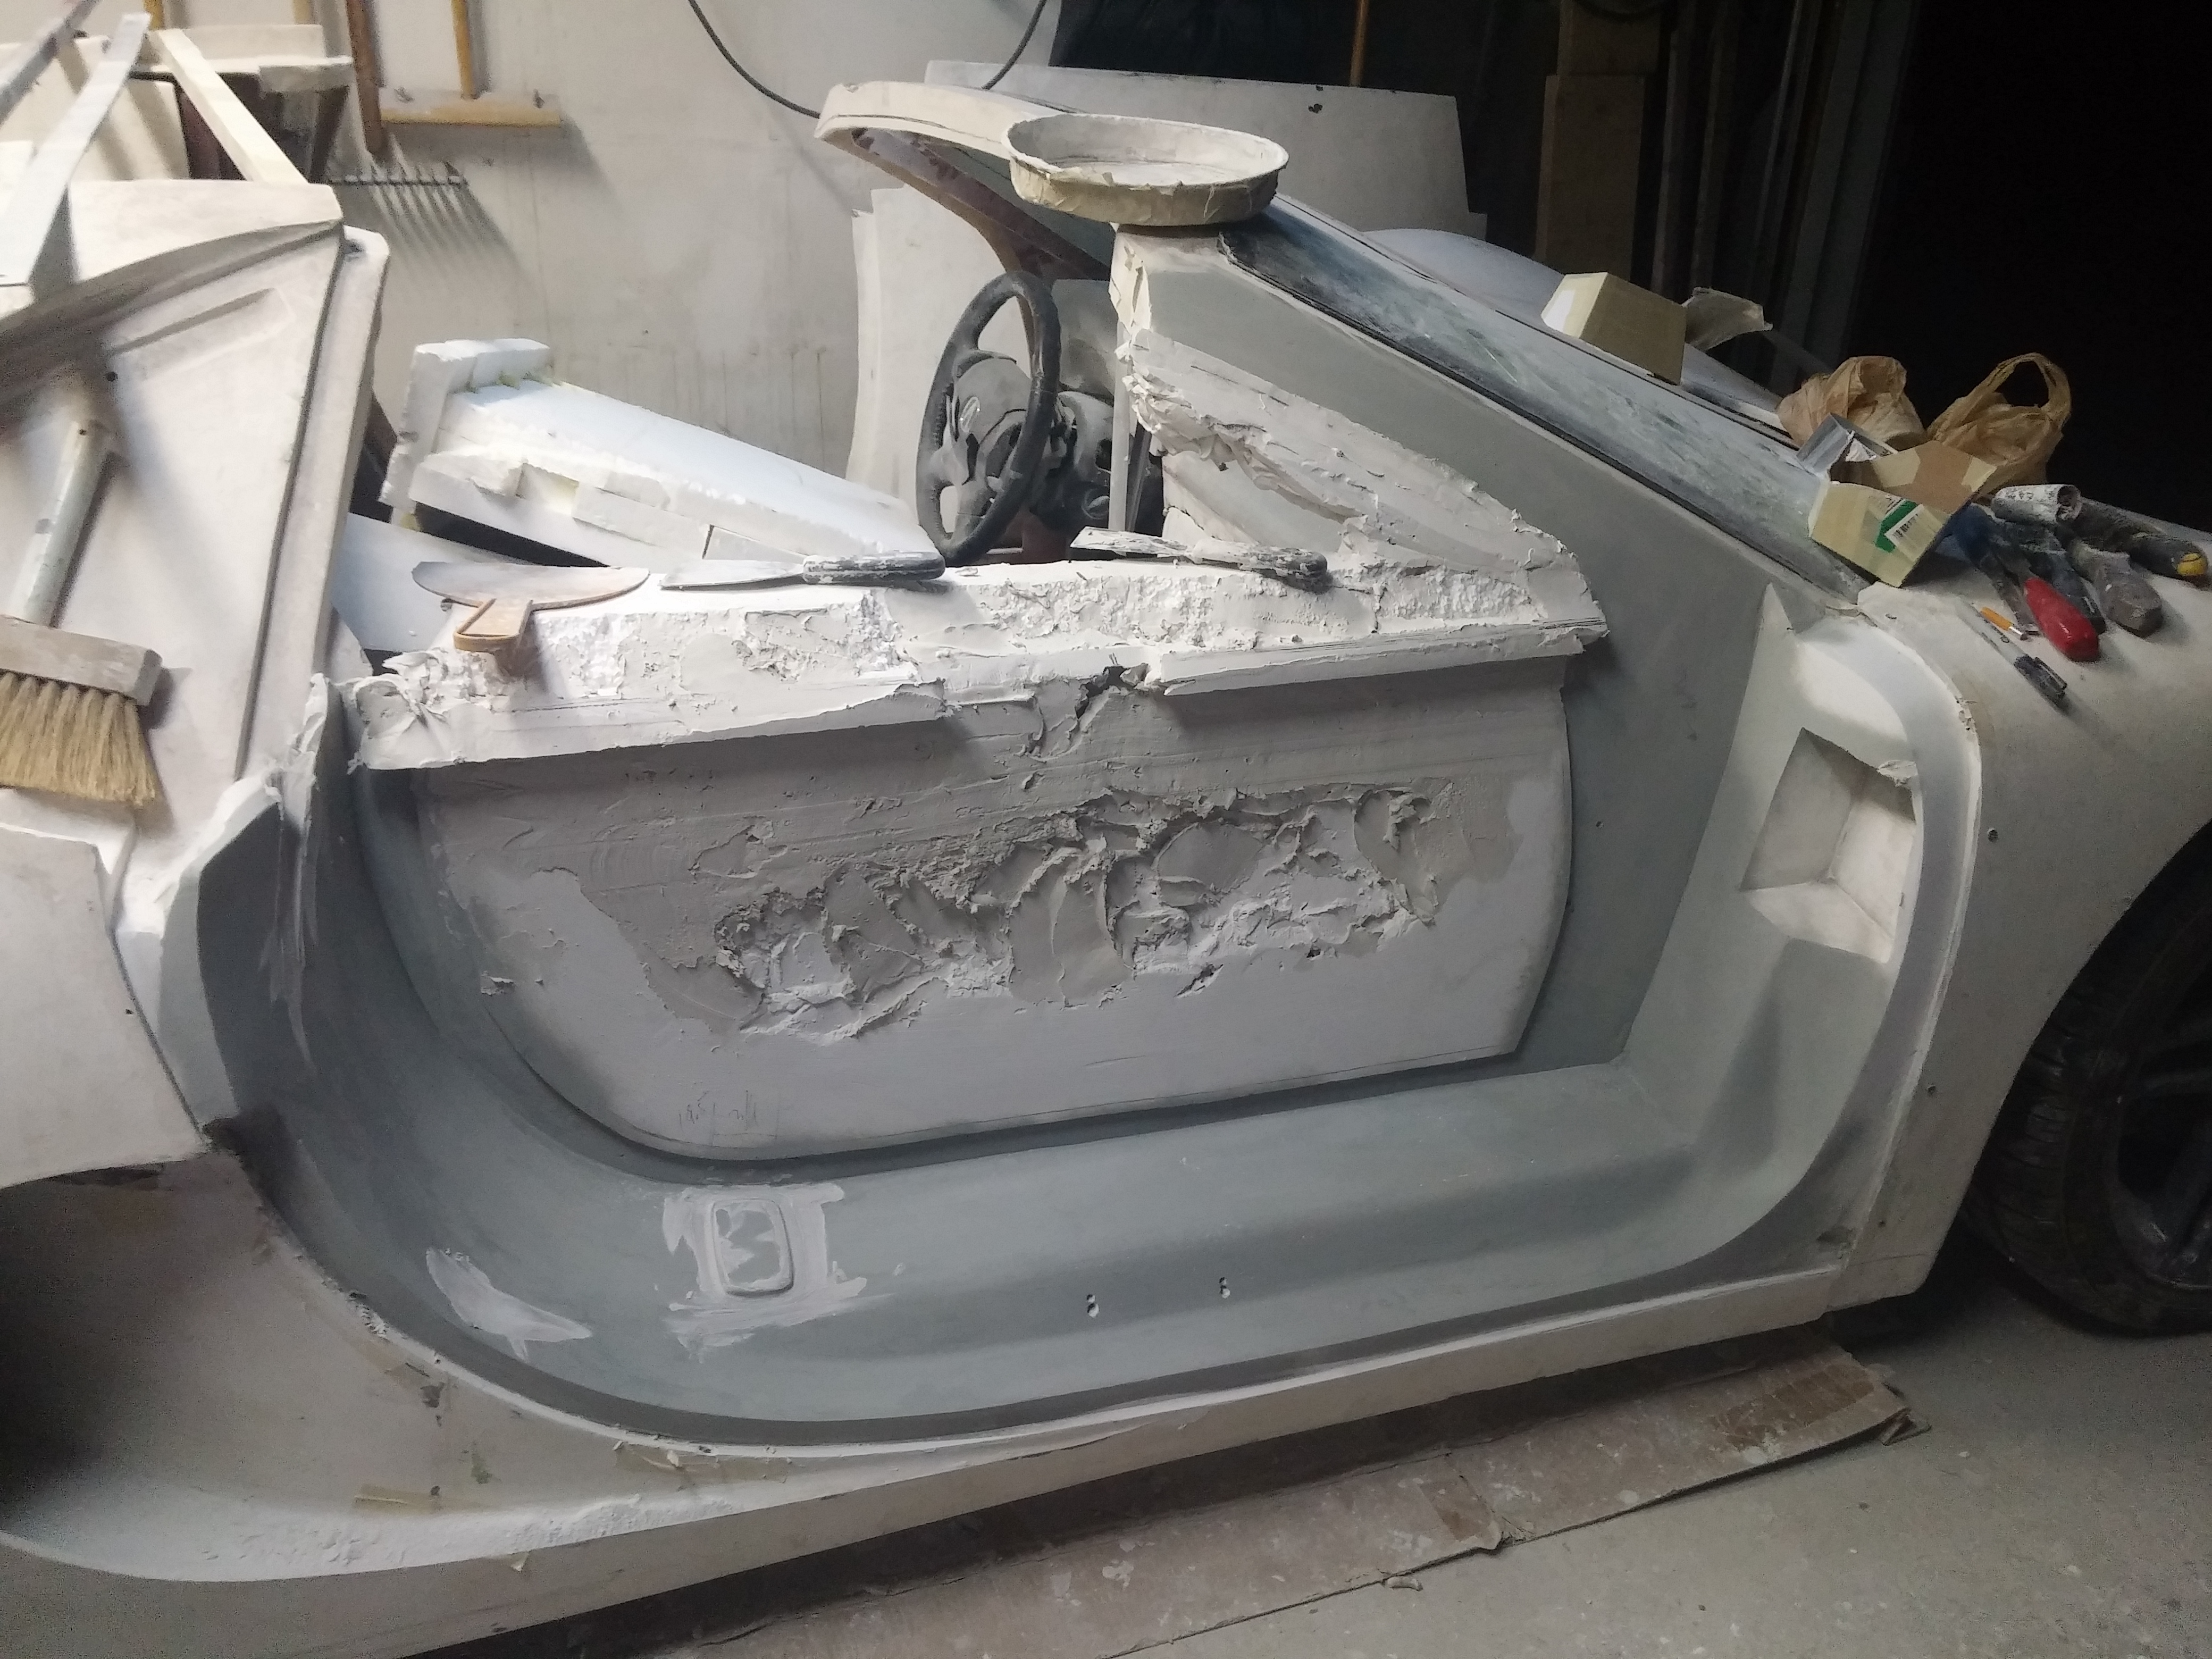
Sep 6 2 hr
Cut out opening for hinge and started filling in to make up gap between
body and inner door shell on right side
sep 12 1hr
filled in surface of the door shell
Sep 15 2hr
filled in seal part of the door shell
Sep 18 1.5hr
made recess for front part of the door
Sep 19 2 hr
made recess for remaining part of the right door
Sep 20 1hr
Trimmed right door skin and inner door shell glass opening
Sep 21 2hr
started on bottom sill side of right door shell plug. adjusted plug of
box for door light and trimmed it into shape. started making
indentation for door light
Sep 22 1hr
Continued with right door shell plug
Sep 23 1hr
Continued with right door shell plug
Sep 24 1hr
Continued with right door shell plug
Sep 26 2hr
Continued with right door shell plug
Sep 26 3.5hr
Continued with right door shell plug
Sep 26 1hr
Continued with right door shell plug
Oct 1 2hr
Continued with right door shell plug. setup regulator position within
the door
Oct 5 3.5hr
Continued with right door shell plug. Adjusted glass clearance. Adjusted
trim clearance. Made template for hinge mount for both doors. This will
speed up making plug for left door.
Refilled voids on the door plug and headlight dust cover.
Oct 6 2hr
Continued with right door shell plug. got it sanded down bit more and
started spraying primer /sealer.
 Reshaped
bit of the dived in front for glass to drop in and refilled some of the
area on top of the shell. Reshaped
bit of the dived in front for glass to drop in and refilled some of the
area on top of the shell.
Glued on pivot points onto headlight dust covers for level adjustments.
Pulled tail light plugs from storage. Taped them up and waxed as
preparation to make a mold/form for lens covers
Oct 8 6.5hr
Continued with right door shell plug. sanded down around hinge extension
and filled in more around top of the door. Did a final sanding on
headlight dust covers and partitioned them for first set of molds.
Looking at the tail lights, skirting will have to be adjusted as
to clear the angles and not to crack the plugs. Plus it will make a much
cleaner shape to the molds when making lenses.
Oct 9 2hr
Adjusted partitioning on tail lights, waxed front and rear plugs and
sprayed PVA
Oct 10 2hr
Layed up fiberglass on all 5 pieces. Filled in more of voids on
the door
Oct 11 4.5hr
Trimmed rough edges from previous day. Partitioned front dust covers and
one rear light bucket, waxed all parts. Other rear bucket got some
damage during pulling and cleaning out from the lens mold
Oct 14 4.5hr
fixed rear right light plug, partitioned, waxed and brushed PVA.
Covered all 5 pieces with gel coat.
Layed up fibreglass for the 5 pieces
Oct 15 2.5hr
Trimmed light buckets from over hanging fiber glass. Grinded down and
contoured left door foam backing. Need to weld up left hinge and cut out
opening for it in the fender / sill.
Oct 18 3.5hr
pulled partitioning material from light buckets and cleaned up all tape
holding it. Partitioned for next part of the mold, waxed and brushed PVA
so that it will be ready to lay it up.
Oct 19 1.5hr
covered the pieces with gel coat and layed up fiberglass completing mold
sets
Oct 27 2hr
back onto the door plug. looked at the glass clearance and the upper
shelf and proximity of it to the glass. Decided to fill in to narrow
down the gap and also build up this crazy part in front of the door
glass.
Not quite dried or cured trimmed excess and let it dry off better for
more detail contouring. Sanded down hinge mounting stub and primed
it to have better idea where to fill in and see how the surface looks
like during next sanding.
Oct 28 1hr
trimmed light molds and drilled bolt holes
Nov 1 1hr
Adjusted and filled in A pillar section and glass front area around
right door
Nov 7 0.5hr
tacked together left door hinge
Nov 8 3.5hr
pulled molds from plugs for left rear tail light and front headlight
dust cover. Cut out hinge opening for left door. Mounted/fastened foam
form for the left door and applied first coat of filler
Nov 10 1hr
Put on a second later of filler on left door
Nov 11 1.5hr
sanded down part of plug A pillar plug on right side. added
thickness to left side and filled in hinge area to get it ready for part
of hinge mount on the inner shell
Nov 12 1.5hr
sanded down left inner door plug, masked off hinge and refilled both
areas
Nov 13 1.5hr
Adjusted right door glass clearance and refilled. Located /
positioned left door hinge mount and applied first filler coat.
Nov 15 1hr
right door refill was a bust and it broke off together with straight
edge. Cleaned up and roughened edge, Checked for low spots on left side
door, sanded down bumps and filled up any low spots and added more
filler to the hinge mount building the area up
Nov 16 3hr
Rough trimmed headlight dust covers. Trimmed left door skin. Build
up door shell hinge area and recess for inner door panel
Nov 17 2.5hr
trimmed and sanded down left door shell. Filled in first part of sill
spacing. Final trim of headlight dust molds rim trims for easier part
making. started making block for strut pivot point
Nov 18 3.5hr
trimmed glass area filled i glass area, filled n hinge area, started
sill plate spacing. cleaned up molds for lights
Nov 20 3hr
adjusted clearance from shell to glass on right side. started carving
out clearance but left it as template for left side. Filled in
further left side sill plate. started making upper regulator mount on
right door.
Nov 22 1.5hr
Adjusted upper window regulator mount on right door and refilled
surfaces. made indentation on sill for regulator.
Cleanup and shaved over fill up on left door. Filled in last spacer on
edge of the door
Nov 23 1.5hr
cleaned up and sanded down left door. filled in forward part of the door
sill, mirror mount and door handle area
Nov 24 2hr
Durabond seems to be drying faster then sheet rock and its also harder
to work with, but on thicker areas its still does take time to dry.
Cleaned up left door and let it sit to cure bit more before applying
more to coat it with more filler. filled in upper part of left door to
make it straight
Nov 25 3hr
sanded down left door, turned an propane heater, it seemed that it
helped drying the filler. filled in more of the top of the
panel line and started on A pillar buildup.
Marked off buildup line for upper door / window trim line and filled up
to make up the necessary level. Started making relieve form for
left door shock
Nov 26 0.5hr
Had very little time, adjusted just the left door around the A pillar
and window glass edge
Nov 27 2.5hr
sanded down left door, shaped pocket for hinge mount and general shape
of it. Measured and setup for top of door ledge. Layed up filler to
build up for sculpting the edge. Trimmed left door skin A pillar rubber
to match right side
Nov 29 1hr
Started sculpting A pillar relieve on shell for rubber seal. Sanded down
left door to as smooth as possible and primed where possible. Compared
left to right
Dec 1 3hr
made cardboard buildup for flange that will be used for filler panel to
close up the door and seal environmental elements of getting into the
cab. Sanded down smooth left door and marked low spots. Adjusted relieve
on right door shell A pillar. Sanded down left door. Started
buildup on right door, filled low spots on left door.
Dec 2 1hr
top coated right door access indentation to semi smooth, still need to sand down and fill
in some small depressions. transferred template for filler plate from
right to left door and roughly filled in the frame
Dec 4 0.5hr
sanded down right and left doors again, filled in right door smooth and
put a second more smoother coat on left door.
Dec 10 3hr
Took pattern form off from left door and sanded down both doors then
primed and top coated to give a smooth surface. May have to do it one
more time and the inside of the doors would be done. However looking at
how the regulator motor needs to be done decided to make up a bump out
for mounting them. So had some foam cut to suit and started to cover it
lightly. Also sanded down blocks for door shocks and re-surfaced
them. Thay are almost done and can go in place soon. Still need to
shape A pillar on left door and fix a small area on right. Once those
are done the doors will be ready for making fiberglass parts
Dec 12 1hr
sanded down to proportions and symmetrical left and right door shock
indentations. Trimmed down regulator motor stand offs and resurfaced it
to make thicker layer
Dec 13 0.5hr
did a quick corner rounding of the door shock indentations and and also
sanded down the regulator motor stand offs ten resurfaced the parts and
still couple low spots on the doors.
Dec 16 2hr
sanded down and primed again door shock indentations. cut in half
regulator motor stand offs, sanded down and filled the open closing off
the foam base. Sanded down A pillar forms on both sides, filled in a bit
on left side. Trimmed left side first panel indentation.
Dec 18 4hr
Sanded down all the screw filling on left and right doors when the
last template was fastened. Sanded down window regulator stand offs and
filled in voids. Sanded down left A pillar and made it more symmetrical
to right side. Sanded down left window ledge and filled in some void
made during sanding grinding.
Dec 21 3hr
Trimmed and sanded down left window sill. carved out window relieve in
left front door. Re-worded A pillar on left door. Surface sanded down
access plate for both doors, However decided not to use the stand offs
for window regulator motors. may rework the idea later after the part is
and see how it will look and work from inside and general esthetics of
the door panel once the regulator is mounted in the door shell. Surfaced
both door access panels, A pillar channels also fastened the blocks for
door shocks. Had to also raise bit of the plug on rear of left door to
lift the shell up around the handle
Dec 22 2hr
Sanded down both center sections, A pillar relieve on both doors. Made
relieve for regulator and glass on left door. Sanded down fill on
door shocks, Surface filled relieves on left door, refilled center and
shock blocks on both doors and build up regulator mount on left door
Dec 28 2hr
made angle adjustments to upper regulator, sanded down all sharp angles
to more round and filled most remaining inner sharp corners the
Dec 29 1.5hr
Trimmed down the upped regulator mount and resurfaced. Also filled in
one more sharp corner. Not sure but most likely will reshape (add curve
into upper part of the shell around window
Dec 30 6.5hr
did a final sanding on door round edges. Trimmed down window ledge.
primed lower parts of doors. Made upper window regulator mounts
symmetrical on both sides. Made A pillar flanges on both doors. build up
left window ledge. filled in ledge to make up rounder curve of the
ledge.
Clean up and put away door glass as it will no longer be needed to model
the shell contour
Dec 31 6.5hr
Never thought of doing it in middle of winter however finished with door
plugs today. Sanded all curved ares under the window sill and anything
around that area. Made up partitions so that fiberglass can be build up
thus having a surface to bond door skin to. Waxed and brushed PVA on
doors. Let it sit and dry up and coated with heavy layer of gel coat.
Thats it for this year. Hopefully Jan 1 will be warm enough to lay down
some fiberglass and be warm enough to cure it even if it takes couple
days.
Total 419.0 hr
This wraps up work for 2016. As part time weekends and
evenings still not for 180.5hr of labour
Now on to 2017 |